The first project of our Spring semester was one I took a personal liking to. We were given the opportunity to work with Habitat for Humanity here in the Palouse to design their next home. Although there wasn't a specific family chosen yet, we were given guidelines to help design the home. We were to design a 3 bedroom, 2 bath home in 1100 square feet. An open floor plan with a combined kitchen and living space was preferred. Budget was a large focus due to the need to keep the cost of the home low. We were also to keep mind sustainability and aging in place.

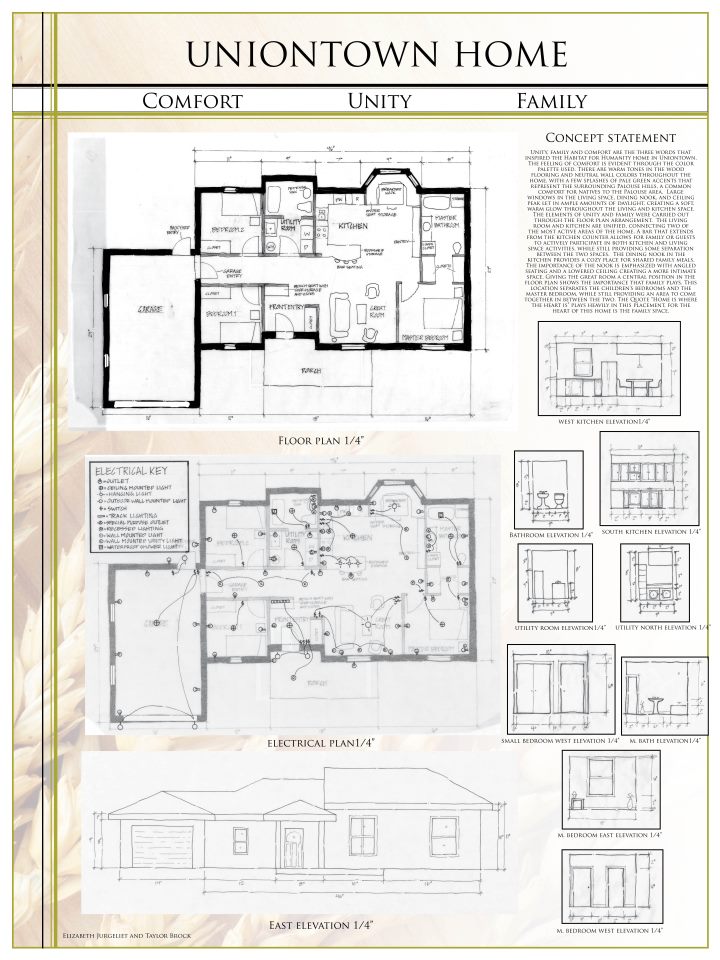
With all this in mind, my partner Liz and I worked to create a space any family could truly enjoy. We worked hard on finding a floor plan that was different from the floor plan of the previous year's Habitat House, to add to the specialness of the home the family would receive. To do this we placed the kitchen/living space in the center of the floor plan. The master bedroom is located on one side of this space, and the children's bedrooms and laundry room are on the other. This allows for a separation between the parent's and children's spaces while creating a combined living space in between. This floor plan arrangement is driven by the quote "Home is where the heart is." The heart of our home design is the family area.


Because there was not a family chosen by the time we did the project we decided to base our material choice on costs and sustainability. We chose to use a cork flooring, which we found for $2.98 a square foot, in the kitchen to help with sustainability. The entryway, utility room, and bathrooms use a marmoleum flooring that was around $3 a square foot. This material is more sustainable than vinyl, and is more durable than linoleum. The rest of the home uses a laminate wood flooring to help lower costs. The kitchen counter uses granite tiles which were $5.93 a square foot. The tiles still give the luxurious look of granite, while providing a much lower price. Although the price is higher than laminate counter top, the use of granite will increase the resale value of the home. The home is painted using a neutral color, but we chose to use an earthy green accent to pull in the comforting green tones of the Palouse.

We had to design the roof for the home and build it on our model, which helped show how much the floor plan can affect the roof.
After way too many hours and a floor full of scraps I finally got our
roof line to work, and I couldn't be more proud. Our wish to include vaulted ceilings with clerestory windows in the living space proved much harder than I expected but added the roof interest the Habitat committee was looking for.
Overall, this project was a great learning experience for me. Being able to communicate with actual clients provided an experience I never expected to have at this stage in my schooling. I was much more attentive to detail, and even more concerned about the decisions I made. Having worked on the previous habitat home allowed me to bring actual experience into the project.


 With all this in mind, my partner Liz and I worked to create a space any family could truly enjoy. We worked hard on finding a floor plan that was different from the floor plan of the previous year's Habitat House, to add to the specialness of the home the family would receive. To do this we placed the kitchen/living space in the center of the floor plan. The master bedroom is located on one side of this space, and the children's bedrooms and laundry room are on the other. This allows for a separation between the parent's and children's spaces while creating a combined living space in between. This floor plan arrangement is driven by the quote "Home is where the heart is." The heart of our home design is the family area.